Using the Curves Tool in the "Photos" App to Adjust Your Photos
This tip assumes you are using the "Photos" app to store your photos. This is the standard app (supplied with every Mac, iPad, and iPhone) from Apple and is where your photos should go unless you change some settings and install a different app. These instructions apply to the Mac; the iPad and iPhone can do the same thing but the instructions will be a bit different.
First, start the Photos app by clicking its icon in the Dock or opening it from the Applications folder (or using any other technique you prefer).
Now, find the photo you want to enhance by clicking "Library" at the top of the bar on the left of the Photos window (if you have no sidebar, go to the "View" menu and choose "Show Sidebar"), then scrolling through the photos until you find the required image.
Double-click the photo so it fills the window.
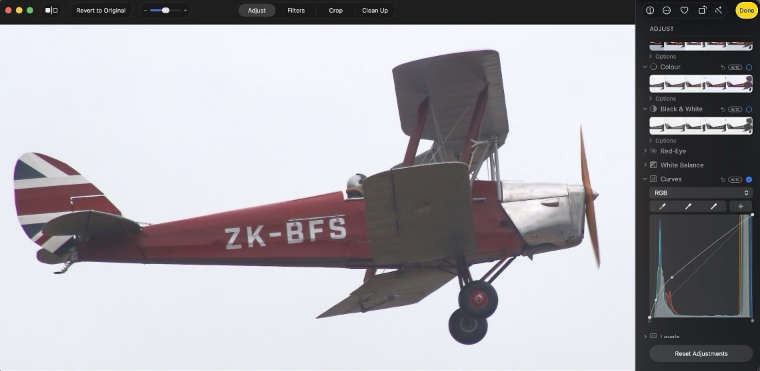
Click the "Edit" button at the top-right of the window. You will see a series of controls down the right side of the main window. You can use these to adjust the image. I suggest practicing on an unimportant image first.
In my opinion, the most useful tool to correct or enhance most photos is the curves tool, so these instructions will use that. You should see a title "Curves" about half way down the controls. If there is no graph immediately underneath this, click the word "Curves" to reveal the graph.
The vertical axis of the graph shows how bright the computer shows pixels with that brightness (each dot which makes up a picture is called a pixel, or "picture element"), with dark pixels on the bottom and bright on the top. The horizontal axis shows how bright the original pixels were, with dark ones on the left and bright on the right.
When you start, the curve tool should show a straight line starting at the bottom-left of the graph and going to the top-right, showing that the brightness on the screen exactly matches the brightness of the dots produced from the camera (a dark pixel on the photo is on the left, and it is shown dark on the screen so is at the bottom). I hope this makes sense!
A common problem with photos is that dark areas are too dark. Increasing the brightness of the whole image will fix this, but it will also make areas which are already bright overexposed and too bright. The curve tool allows you to brighten dark areas without making the bright areas too bright.
So click on the line near the bottom-left and drag up. While you do this, watch the photo, not the graph. If you drag too far the photo will look much worse, just drag back down a bit again. You can also release the mouse and use undo.
After brightening the dark areas you might still find the bright areas are too bright. To fix this click the curve near the top-right and drag it down until the bright areas are restored to a reasonable level of brightness. Note that the dark areas you adjusted earlier should stay brighter.
You can repeat this process by adjusting as many parts of the curve as you need, but I find two is usually enough. Note that there should be dots on the curve showing where you made the adjustment which will help understanding what you have changed.
Of course, you can also make images which are too bright a bit dimmer by dragging down instead of up.
When you get the image looking tahe way you want, just click "Done" at top-right of the window. Click the back button "<" near top-left to return to the list of photos.
I usually write a blog post about once a week. The latest post can be viewed here: Think for Yourself: In the end, everything is just an opinion. Be skeptical, and think for yourself! (posted 2026-04-25 at 21:12:02). Or go to the Home Page of My Blog to choose a post to view.
Latest Site News and Notifications (Desktop): You are currently viewing OJB's web site, version 2.4 which has some major changes, and possibly errors! Please report any problems to ojb@mac.com.